Quinoa Salad featuring Roasted Red Peppers and Feta Cheese
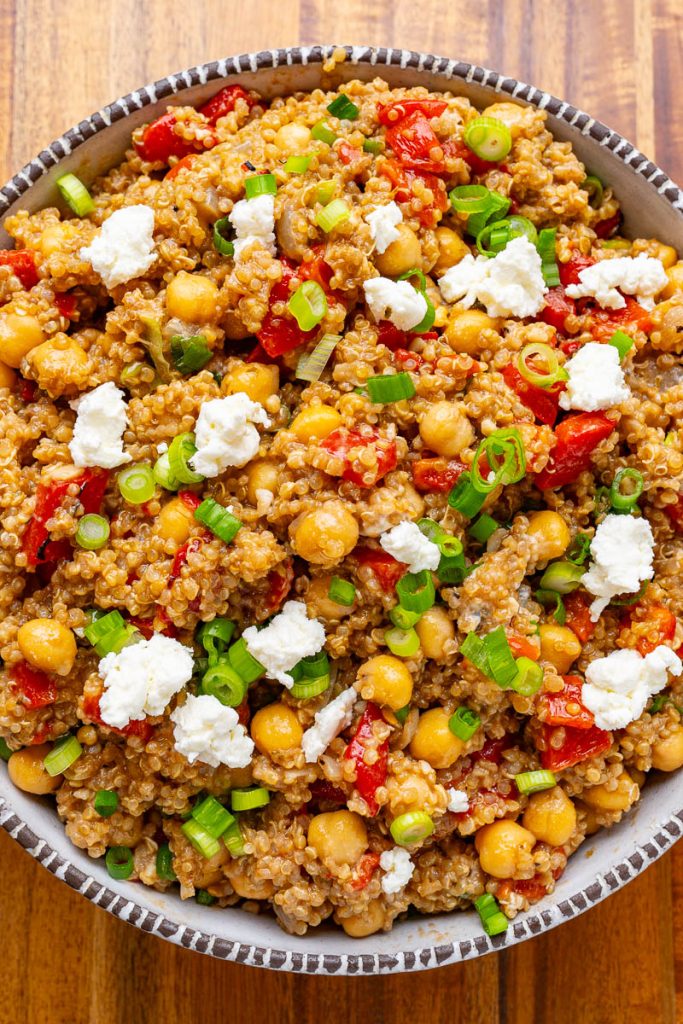
Quinoa Salad with Roasted Red Peppers and Feta
Prep Time: 5 minutes Cook Time: 30 minutes Total Time: 35 minutes Servings: 4
A salad featuring quinoa, roasted red peppers, chickpeas, and feta dressed in a balsamic vinaigrette!
ingredients
directions
- In a medium saucepan, heat the oil over medium heat, then add the onions and sauté until soft, approximately 8-10 minutes.
- Stir in the garlic and cook until aromatic, around one minute.
- Mix in the quinoa and broth, bring to a boil, then lower the heat and cover, simmering for 15 minutes before turning off the heat and allowing it to rest, covered, for 5 minutes.
- Incorporate the roasted red peppers, chickpeas, feta, green onions, and balsamic vinegar, stir well and enjoy!
Option: Swap feta for chevre/goat cheese.
Option: Substitute roasted red peppers with sliced sun-dried tomatoes.

Traditional Deviled Eggs Recipe: A Dependable Manual
# Traditional Deviled Eggs: An Enduring Starter
Deviled eggs remain a cherished favorite, ideal for festive occasions, gatherings, and celebrations. With their decadent, velvety filling and uncomplicated ingredients, they serve as a straightforward starter that everyone loves. They’re not only suitable for preparing ahead of time, but they also tend to vanish rapidly at events.
## Taste Profile
These deviled eggs feature a charming mix of flavors. The creaminess of mayonnaise is countered by the tanginess of vinegar and mustard, accented with a peppery kick and a dash of smoky paprika. This blend creates a dish that’s just right for parties and caters to a variety of tastes.
## Preparation Suggestions
– **Prepare in Advance**: Deviled eggs can be made up to two days prior. Just keep them chilled until you’re set to serve.
– **Presentation**: For a more elegant appearance, you might use a piping bag to fill the egg whites with the yolk mixture.
– **Time-Saving**: If you’re pressed for time, many supermarkets provide pre-boiled and perfectly shelled eggs in the deli area.
## Serving Ideas
Deviled eggs are a must-have at family reunions. They can be arranged on a specialized deviled egg platter for convenient transport. To add a twist to the classic, think about variations like avocado deviled eggs or pimento cheese deviled eggs.
## Ingredients
– **Eggs**: Opt for large eggs; slightly older eggs usually peel more effortlessly than very fresh ones.
– **Mayonnaise**: Full-fat mayonnaise produces the creamiest, richest filling. Greek yogurt may serve as a lighter, tangier alternative.
– **Vinegar**: This ingredient elevates the filling. It can be swapped with pickle juice or apple cider vinegar for a different taste.
– **Variations**: Enhance the filling with relish for tang, a splash of hot sauce or cayenne for spice, or a dollop of sour cream or softened cream cheese for added creaminess. Top with bacon bits or chives for enhanced flavor.
## How to Prepare Classic Deviled Eggs
1. **Boil the Eggs**: Place eggs in a pot and cover with water. Bring to a vigorous boil, then cover and take off the heat. Allow to sit for 15-17 minutes.
2. **Cool and Peel**: Move eggs to an ice water bath for 5-10 minutes. Peel them under cool running water.
3. **Make the Filling**: Halve the eggs lengthwise, take out the yolks and place them in a bowl. Mash the yolks and combine with mayonnaise, vinegar, mustard, salt, and pepper until uniform.
4. **Fill the Egg Whites**: Spoon or pipe the yolk mixture back into the egg whites. Top with paprika and fresh dill before serving.
### Success Tips
– For the silkiest filling, ensure yolks are thoroughly mashed before incorporating mayonnaise.
– To avoid gray-green yolks, cool eggs in ice water right after cooking.
– Peel eggs under cool running water to simplify the process.
– If the filling is overly thick, add a few drops of mayo or vinegar until it achieves the desired texture.
– Store egg whites and filling separately if preparing in advance, filling just before serving to prevent soggy whites.
– When transporting, line a container with a paper towel, pack the eggs snugly, and garnish upon arrival.
## Storing Deviled Eggs
Leftover deviled eggs can be kept in an airtight container in the refrigerator for up to four days. Freezing is not advisable. If you have extras, consider mashing them for a tasty egg salad for sandwiches or wraps.
### Nutrition Information (per egg)
– **Calories**: 68
– **Protein**: 3g
– **Fat**: 6g
– **Carbohydrates**: 0.2g
– **Cholesterol**: 95mg
– **Sodium**: 94mg
Deviled eggs are not only a traditional starter but also a flexible dish that can be adapted to various preferences. Whether you adhere to the classic recipe or venture into new variations, these eggs are guaranteed to be popular at your next event.
How to Make Ideal Hard Boiled Eggs for Weekly Munching
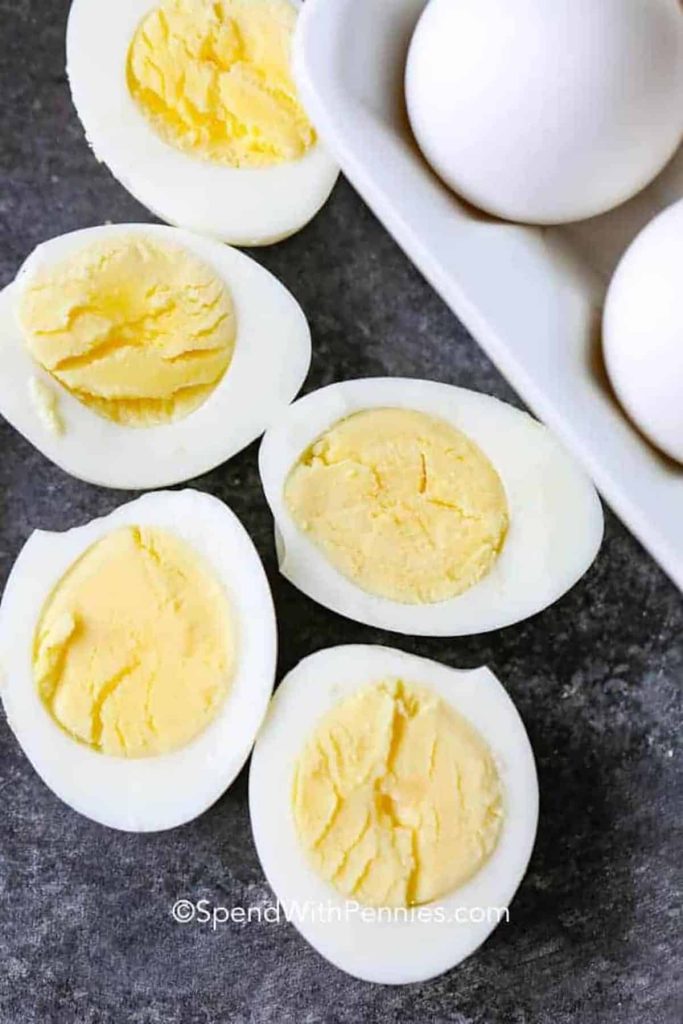
# Ideal Hard Boiled Eggs: An Infalible Technique
Hard boiled eggs are an adaptable and healthy food choice, excellent for meal preparation, snacks, or integrating into your beloved dishes. By following a proven technique, you can consistently create ideal hard boiled eggs, showcasing vivid yellow yolks and shells that come off effortlessly.
## Taste Profile
Hard boiled eggs possess a subtle, creamy taste defined by silky whites and sumptuous yolks. This makes them a fantastic enhancement to a range of recipes or a fulfilling snack by themselves.
## Why Choose This Technique?
This infallible method guarantees that your hard boiled eggs yield vibrant yellow yolks free from the unattractive grey ring often resulting from overcooking. Furthermore, the eggs peel effortlessly, making them perfect for quick snacks, salads, and meal prep.
## Efficiency in Time
Cooking a batch of hard boiled eggs at the week’s start can help you save time and energy, offering quick alternatives for snacks, breakfasts, and lunches.
## Serving Recommendations
Hard boiled eggs can be relished in various ways, including:
– [Deviled eggs](https://www.spendwithpennies.com/classic-deviled-eggs-recipe/)
– [Egg salad](https://www.spendwithpennies.com/best-egg-salad-recipe/)
– [Cobb salads](https://www.spendwithpennies.com/cobb-salad/)
– As a protein-rich snack
## Steps to Cook a Flawless Hard Boiled Egg
1. Place eggs in a pot and cover with cold water (full recipe below).
2. Bring the water to a vigorous boil, cover, take it off the heat, and let the eggs rest.
3. Move eggs into a large bowl filled with ice water for 5 minutes prior to peeling.
## Hard Boiled Egg Timing: A Doneness Guide
Timing is key to reaching your desired doneness. The chart below serves as a reference for large eggs taken directly from the fridge. Modify the resting time by a minute or two if you are using medium, extra-large, or room temperature eggs.
| Doneness | Time |
|——————-|—————|
| Soft-Boiled Eggs | 6 to 8 minutes|
| Jammy Eggs | 8 to 10 minutes|
| Hard-Boiled Eggs | 15 to 17 minutes|
## Tips for Effortless Peeling
– **Opt for Older Eggs**: Slightly aged eggs generally peel more easily than very fresh ones.
– **Crack Before Peeling**: Lightly tap or roll the egg on the counter to loosen the shell.
– **Start at the Wide End**: The wide end often has an air pocket, facilitating easier peeling.
– **Peel Under Water**: Peel the eggs under cold running water to assist in clean shell removal.
## Storing and Leftovers
Unpeeled hard boiled eggs can be kept in an airtight container in the refrigerator for up to 7 days. Peeled eggs can last up to 5 days; placing a damp paper towel can help avoid drying. Whole boiled eggs do not freeze well, though cooked yolks can be frozen.
### Common Questions
– **How many eggs can I cook in my pot?**
Keep eggs in a single layer for uniform cooking. For larger batches, use a wider saucepan.
– **What if my egg cracked while cooking?**
If an egg cracks, it’s still safe to eat. A gentle boil and starting with cold water can help minimize cracking.
– **Is an ice bath necessary after cooking?**
Yes! An ice bath halts carryover cooking and prevents gray-green rings, ensuring perfect yellow yolks.
– **Why do older eggs peel better?**
The pH levels of fresh egg whites vary from those of older eggs. As eggs age, the pH becomes more alkaline, making peeling easier.
– **Can I use this technique for soft-boiled eggs?**
Yes, this method works for softer yolks as well. Adjust the resting time as needed.
## Quick Enhancements for Lunch and Snacks
Hard boiled eggs are a superb way to elevate your meals. Whether integrating them into salads, creating a quick egg salad, or enjoying them as a snack, they provide a nutritious boost.
### Did you try making these Hard Boiled Eggs? Please provide a rating and leave a comment below!
## Recipe for Ideal Hard Boiled Eggs
### Ingredients
– 6 large eggs
### Instructions
1. Arrange a single layer of eggs in a saucepan. Fill with cool water, ensuring it is at least ½-inch above the eggs.
2. Bring the water to a vigorous boil over high heat. Cover and remove from heat.
3. Allow to sit covered for 15 to 17 minutes (for large eggs).
4. Prepare a bowl of ice water. After the eggs have rested, transfer them to the ice water for a minimum of 5 minutes.

Weekly Meal Schedule for April 6, 2026
### Receive Tasty New Recipes Every Day
In the modern, fast-moving world, carving out time to make nutritious and tasty meals can prove to be difficult. Nonetheless, with the appropriate tools, you can seamlessly introduce fresh and thrilling recipes into your everyday schedule. One of the most effective methods to uncover new culinary inspirations is by signing up for daily recipe notifications. Here’s how you can take advantage of this service and what you can anticipate.
#### Reasons to Subscribe for Daily Recipes
1. **Diversity and Motivation**: Daily recipe subscriptions offer an extensive array of meal suggestions that can motivate you to explore different cuisines and cooking methods. This assortment keeps your meals exciting and helps avoid the repetition of eating the same meals over and over.
2. **Efficiency**: By receiving daily recipes straight to your inbox, you can save time on meal preparation and the hunt for fresh ideas. This ease allows you to concentrate on cooking and savoring your meals instead of worrying about what to make.
3. **Nutritious Choices**: Numerous recipe subscriptions emphasize healthy eating, providing wholesome options that accommodate various dietary preferences. This can assist you in making healthier food decisions and sustaining a well-rounded diet.
4. **Cooking Expertise Growth**: Experimenting with new recipes can refine your culinary abilities. You’ll gain knowledge of new methods, ingredients, and flavor pairings, which can enhance your self-assurance in the kitchen.
5. **Networking and Encouragement**: Subscribing to a recipe service often connects you to a network of fellow food lovers. You can share your stories, seek guidance, and even trade tips with others who are on a similar culinary path.
#### Steps to Subscribe
Enrolling in a daily recipe service is generally a simple process. Here’s a basic overview of the steps involved:
1. **Go to the Subscription Page**: Head over to the website that offers the recipe subscription. Look for a section specifically for meal planning or recipe updates.
2. **Provide Your Email**: Enter your email address in the designated field. This is crucial for receiving your daily recipes.
3. **Accept Terms**: Many services require you to agree to their terms and conditions, including a GDPR agreement if you reside in the EU. This ensures your data is managed responsibly.
4. **Submit Your Details**: After completing the required fields, submit your details. You might receive a confirmation email to validate your subscription.
5. **Savor Your Recipes**: Once you’re subscribed, you’ll begin getting delightful recipes sent directly to your inbox. Remember to check your email frequently for fresh ideas!
#### Unsubscription
If you ever choose that the service is not for you anymore, most subscription services allow for easy unsubscription. Look for the “unsubscribe” link usually located at the bottom of the emails you receive.
#### Stay Connected for More Ideas
Besides subscribing for daily recipes, think about following culinary influencers and food blogs on social media platforms. Engaging with these communities can offer even more creativity and keep you informed on the latest cooking trends.
– **Facebook**: Join groups or follow pages focused on cooking and recipes.
– **Instagram**: Discover food visuals and recipe reels for visual motivation.
– **Pinterest**: Uncover countless recipes and meal suggestions through attractive pins.
– **YouTube**: View cooking demonstrations to learn new techniques and recipes in practice.
– **TikTok**: Follow food creators for quick and fun recipe concepts.
By signing up for a daily recipe service and interacting with cooking communities online, you can elevate your culinary experience and relish a variety of delightful meals each day.

Oven-Roasted Sweet Potatoes with Luscious Center and Crunchy Exteriors
# Roasted Sweet Potatoes: A Warm and Flexible Accompaniment
Roasted sweet potatoes are an effortless, low-maintenance side that delivers a lovely contrast between crisp exteriors and airy, soft insides. This straightforward cooking method provides a warm and adaptable addition to any dining experience, making them a popular choice for both laid-back meals and special celebrations.
## Taste Profile
Roasted sweet potatoes feature sweet, buttery interiors paired with savory, well-seasoned skins. Their innate sweetness complements a range of toppings, enhancing their versatility across various culinary styles and personal tastes.
## Why Prepare Roasted Sweet Potatoes?
The charm of roasted sweet potatoes lies in their simple preparation and cooking process. Using only a baking tray, a fork, and chosen seasonings, you can produce perfectly roasted sweet potatoes every time. This technique minimizes dish usage, simplifying the cleanup process.
## Method
The process for roasting sweet potatoes is simple:
1. Create holes in the potatoes to let steam escape.
2. Coat them with oil and seasonings to boost flavor and texture.
3. Roast until tender, then let them rest briefly before serving.
## Skill Level
This dish is accessible for cooks of any proficiency, requiring little effort and time for preparation.
## Ingredients
– **Sweet Potatoes**: Select medium-sized sweet potatoes that are roughly uniform for consistent cooking. Prefer orange-fleshed types, as they usually result in a fluffier texture. Be cautious of the distinction between sweet potatoes and yams, as they are commonly misidentified in stores.
– **Seasonings**: Applying olive oil, avocado oil, vegetable oil, or melted butter to the skins promotes browning and imparts a delicious roasted flavor.
## Sweet Potato Garnishes
After your sweet potatoes are roasted, the topping possibilities are limitless. You can personalize them with items such as:
– Butter or ghee
– Brown sugar or maple syrup
– Cinnamon or nutmeg
– Sour cream or Greek yogurt
– Chopped nuts or seeds
– Fresh herbs or chives
## Steps to Roast Sweet Potatoes
1. Preheat your oven to 375°F (190°C).
2. Wash and dry the sweet potatoes. Poke holes in each potato with a fork, about 3-4 times on each side.
3. Coat the skins with olive oil and sprinkle with salt and pepper.
4. Arrange the potatoes on a baking sheet and roast for 50-60 minutes, or until tender when pierced with a fork. Let cool for 5 minutes before slicing open.
### Cooking Temperature and Times
– Roast at 350°F for 60 to 75 minutes
– Roast at 375°F for 50 to 60 minutes
– Roast at 400°F for 40 to 50 minutes
Cooking times may differ based on the size of the sweet potatoes. Make sure they are soft when tested with a fork.
## Tips for Ideally Roasted Sweet Potatoes
– **For uniform cooking**: Roast potatoes that are similar in size.
– **For perfect roasting**: Ensure the potatoes are thoroughly dried before applying oil to guarantee the skins roast rather than steam.
– **To avoid cracking**: Poke sufficient holes (3 to 4 per side) for steam to escape.
– **For drier skins**: Refrain from using foil.
– **For extra airy centers**: Slice open immediately after roasting and gently fluff with a fork to release steam.
– **Meal prep suggestion**: Roast a batch and use leftovers in breakfast bowls, quick mashed sweet potatoes, or stir into chili.
## Storage, Freezing, and Reheating
Leftover roasted sweet potatoes can be kept in an airtight container in the refrigerator for up to 4 days. For freezing, scoop out the cooked flesh, cool it, and then store in airtight bags for up to 3 months. Thaw in the refrigerator and reheat in the microwave or a 375°F oven until warmed through.
Roasted sweet potatoes are not only a delightful side but also a nutritious option, packed with vitamins and minerals. Enjoy exploring various toppings and flavors to customize this flexible dish to your taste!

Quinoa Salad featuring Roasted Red Peppers and Feta Cheese
Quinoa Salad with Roasted Red Peppers and Feta
Prep Time: 5 minutes Cook Time: 30 minutes Total Time: 35 minutes Servings: 4
A salad featuring quinoa, roasted red peppers, chickpeas, and feta dressed in a balsamic vinaigrette!
ingredients
directions
- In a medium saucepan, heat the oil over medium heat, then add the onions and sauté until soft, approximately 8-10 minutes.
- Stir in the garlic and cook until aromatic, around one minute.
- Mix in the quinoa and broth, bring to a boil, then lower the heat and cover, simmering for 15 minutes before turning off the heat and allowing it to rest, covered, for 5 minutes.
- Incorporate the roasted red peppers, chickpeas, feta, green onions, and balsamic vinegar, stir well and enjoy!
Option: Swap feta for chevre/goat cheese.
Option: Substitute roasted red peppers with sliced sun-dried tomatoes.

Traditional Deviled Eggs Recipe: A Dependable Manual
# Traditional Deviled Eggs: An Enduring Starter
Deviled eggs remain a cherished favorite, ideal for festive occasions, gatherings, and celebrations. With their decadent, velvety filling and uncomplicated ingredients, they serve as a straightforward starter that everyone loves. They’re not only suitable for preparing ahead of time, but they also tend to vanish rapidly at events.
## Taste Profile
These deviled eggs feature a charming mix of flavors. The creaminess of mayonnaise is countered by the tanginess of vinegar and mustard, accented with a peppery kick and a dash of smoky paprika. This blend creates a dish that’s just right for parties and caters to a variety of tastes.
## Preparation Suggestions
– **Prepare in Advance**: Deviled eggs can be made up to two days prior. Just keep them chilled until you’re set to serve.
– **Presentation**: For a more elegant appearance, you might use a piping bag to fill the egg whites with the yolk mixture.
– **Time-Saving**: If you’re pressed for time, many supermarkets provide pre-boiled and perfectly shelled eggs in the deli area.
## Serving Ideas
Deviled eggs are a must-have at family reunions. They can be arranged on a specialized deviled egg platter for convenient transport. To add a twist to the classic, think about variations like avocado deviled eggs or pimento cheese deviled eggs.
## Ingredients
– **Eggs**: Opt for large eggs; slightly older eggs usually peel more effortlessly than very fresh ones.
– **Mayonnaise**: Full-fat mayonnaise produces the creamiest, richest filling. Greek yogurt may serve as a lighter, tangier alternative.
– **Vinegar**: This ingredient elevates the filling. It can be swapped with pickle juice or apple cider vinegar for a different taste.
– **Variations**: Enhance the filling with relish for tang, a splash of hot sauce or cayenne for spice, or a dollop of sour cream or softened cream cheese for added creaminess. Top with bacon bits or chives for enhanced flavor.
## How to Prepare Classic Deviled Eggs
1. **Boil the Eggs**: Place eggs in a pot and cover with water. Bring to a vigorous boil, then cover and take off the heat. Allow to sit for 15-17 minutes.
2. **Cool and Peel**: Move eggs to an ice water bath for 5-10 minutes. Peel them under cool running water.
3. **Make the Filling**: Halve the eggs lengthwise, take out the yolks and place them in a bowl. Mash the yolks and combine with mayonnaise, vinegar, mustard, salt, and pepper until uniform.
4. **Fill the Egg Whites**: Spoon or pipe the yolk mixture back into the egg whites. Top with paprika and fresh dill before serving.
### Success Tips
– For the silkiest filling, ensure yolks are thoroughly mashed before incorporating mayonnaise.
– To avoid gray-green yolks, cool eggs in ice water right after cooking.
– Peel eggs under cool running water to simplify the process.
– If the filling is overly thick, add a few drops of mayo or vinegar until it achieves the desired texture.
– Store egg whites and filling separately if preparing in advance, filling just before serving to prevent soggy whites.
– When transporting, line a container with a paper towel, pack the eggs snugly, and garnish upon arrival.
## Storing Deviled Eggs
Leftover deviled eggs can be kept in an airtight container in the refrigerator for up to four days. Freezing is not advisable. If you have extras, consider mashing them for a tasty egg salad for sandwiches or wraps.
### Nutrition Information (per egg)
– **Calories**: 68
– **Protein**: 3g
– **Fat**: 6g
– **Carbohydrates**: 0.2g
– **Cholesterol**: 95mg
– **Sodium**: 94mg
Deviled eggs are not only a traditional starter but also a flexible dish that can be adapted to various preferences. Whether you adhere to the classic recipe or venture into new variations, these eggs are guaranteed to be popular at your next event.
Read More
How to Make Ideal Hard Boiled Eggs for Weekly Munching
# Ideal Hard Boiled Eggs: An Infalible Technique
Hard boiled eggs are an adaptable and healthy food choice, excellent for meal preparation, snacks, or integrating into your beloved dishes. By following a proven technique, you can consistently create ideal hard boiled eggs, showcasing vivid yellow yolks and shells that come off effortlessly.
## Taste Profile
Hard boiled eggs possess a subtle, creamy taste defined by silky whites and sumptuous yolks. This makes them a fantastic enhancement to a range of recipes or a fulfilling snack by themselves.
## Why Choose This Technique?
This infallible method guarantees that your hard boiled eggs yield vibrant yellow yolks free from the unattractive grey ring often resulting from overcooking. Furthermore, the eggs peel effortlessly, making them perfect for quick snacks, salads, and meal prep.
## Efficiency in Time
Cooking a batch of hard boiled eggs at the week’s start can help you save time and energy, offering quick alternatives for snacks, breakfasts, and lunches.
## Serving Recommendations
Hard boiled eggs can be relished in various ways, including:
– [Deviled eggs](https://www.spendwithpennies.com/classic-deviled-eggs-recipe/)
– [Egg salad](https://www.spendwithpennies.com/best-egg-salad-recipe/)
– [Cobb salads](https://www.spendwithpennies.com/cobb-salad/)
– As a protein-rich snack
## Steps to Cook a Flawless Hard Boiled Egg
1. Place eggs in a pot and cover with cold water (full recipe below).
2. Bring the water to a vigorous boil, cover, take it off the heat, and let the eggs rest.
3. Move eggs into a large bowl filled with ice water for 5 minutes prior to peeling.
## Hard Boiled Egg Timing: A Doneness Guide
Timing is key to reaching your desired doneness. The chart below serves as a reference for large eggs taken directly from the fridge. Modify the resting time by a minute or two if you are using medium, extra-large, or room temperature eggs.
| Doneness | Time |
|——————-|—————|
| Soft-Boiled Eggs | 6 to 8 minutes|
| Jammy Eggs | 8 to 10 minutes|
| Hard-Boiled Eggs | 15 to 17 minutes|
## Tips for Effortless Peeling
– **Opt for Older Eggs**: Slightly aged eggs generally peel more easily than very fresh ones.
– **Crack Before Peeling**: Lightly tap or roll the egg on the counter to loosen the shell.
– **Start at the Wide End**: The wide end often has an air pocket, facilitating easier peeling.
– **Peel Under Water**: Peel the eggs under cold running water to assist in clean shell removal.
## Storing and Leftovers
Unpeeled hard boiled eggs can be kept in an airtight container in the refrigerator for up to 7 days. Peeled eggs can last up to 5 days; placing a damp paper towel can help avoid drying. Whole boiled eggs do not freeze well, though cooked yolks can be frozen.
### Common Questions
– **How many eggs can I cook in my pot?**
Keep eggs in a single layer for uniform cooking. For larger batches, use a wider saucepan.
– **What if my egg cracked while cooking?**
If an egg cracks, it’s still safe to eat. A gentle boil and starting with cold water can help minimize cracking.
– **Is an ice bath necessary after cooking?**
Yes! An ice bath halts carryover cooking and prevents gray-green rings, ensuring perfect yellow yolks.
– **Why do older eggs peel better?**
The pH levels of fresh egg whites vary from those of older eggs. As eggs age, the pH becomes more alkaline, making peeling easier.
– **Can I use this technique for soft-boiled eggs?**
Yes, this method works for softer yolks as well. Adjust the resting time as needed.
## Quick Enhancements for Lunch and Snacks
Hard boiled eggs are a superb way to elevate your meals. Whether integrating them into salads, creating a quick egg salad, or enjoying them as a snack, they provide a nutritious boost.
### Did you try making these Hard Boiled Eggs? Please provide a rating and leave a comment below!
## Recipe for Ideal Hard Boiled Eggs
### Ingredients
– 6 large eggs
### Instructions
1. Arrange a single layer of eggs in a saucepan. Fill with cool water, ensuring it is at least ½-inch above the eggs.
2. Bring the water to a vigorous boil over high heat. Cover and remove from heat.
3. Allow to sit covered for 15 to 17 minutes (for large eggs).
4. Prepare a bowl of ice water. After the eggs have rested, transfer them to the ice water for a minimum of 5 minutes.

Weekly Meal Schedule for April 6, 2026
### Receive Tasty New Recipes Every Day
In the modern, fast-moving world, carving out time to make nutritious and tasty meals can prove to be difficult. Nonetheless, with the appropriate tools, you can seamlessly introduce fresh and thrilling recipes into your everyday schedule. One of the most effective methods to uncover new culinary inspirations is by signing up for daily recipe notifications. Here’s how you can take advantage of this service and what you can anticipate.
#### Reasons to Subscribe for Daily Recipes
1. **Diversity and Motivation**: Daily recipe subscriptions offer an extensive array of meal suggestions that can motivate you to explore different cuisines and cooking methods. This assortment keeps your meals exciting and helps avoid the repetition of eating the same meals over and over.
2. **Efficiency**: By receiving daily recipes straight to your inbox, you can save time on meal preparation and the hunt for fresh ideas. This ease allows you to concentrate on cooking and savoring your meals instead of worrying about what to make.
3. **Nutritious Choices**: Numerous recipe subscriptions emphasize healthy eating, providing wholesome options that accommodate various dietary preferences. This can assist you in making healthier food decisions and sustaining a well-rounded diet.
4. **Cooking Expertise Growth**: Experimenting with new recipes can refine your culinary abilities. You’ll gain knowledge of new methods, ingredients, and flavor pairings, which can enhance your self-assurance in the kitchen.
5. **Networking and Encouragement**: Subscribing to a recipe service often connects you to a network of fellow food lovers. You can share your stories, seek guidance, and even trade tips with others who are on a similar culinary path.
#### Steps to Subscribe
Enrolling in a daily recipe service is generally a simple process. Here’s a basic overview of the steps involved:
1. **Go to the Subscription Page**: Head over to the website that offers the recipe subscription. Look for a section specifically for meal planning or recipe updates.
2. **Provide Your Email**: Enter your email address in the designated field. This is crucial for receiving your daily recipes.
3. **Accept Terms**: Many services require you to agree to their terms and conditions, including a GDPR agreement if you reside in the EU. This ensures your data is managed responsibly.
4. **Submit Your Details**: After completing the required fields, submit your details. You might receive a confirmation email to validate your subscription.
5. **Savor Your Recipes**: Once you’re subscribed, you’ll begin getting delightful recipes sent directly to your inbox. Remember to check your email frequently for fresh ideas!
#### Unsubscription
If you ever choose that the service is not for you anymore, most subscription services allow for easy unsubscription. Look for the “unsubscribe” link usually located at the bottom of the emails you receive.
#### Stay Connected for More Ideas
Besides subscribing for daily recipes, think about following culinary influencers and food blogs on social media platforms. Engaging with these communities can offer even more creativity and keep you informed on the latest cooking trends.
– **Facebook**: Join groups or follow pages focused on cooking and recipes.
– **Instagram**: Discover food visuals and recipe reels for visual motivation.
– **Pinterest**: Uncover countless recipes and meal suggestions through attractive pins.
– **YouTube**: View cooking demonstrations to learn new techniques and recipes in practice.
– **TikTok**: Follow food creators for quick and fun recipe concepts.
By signing up for a daily recipe service and interacting with cooking communities online, you can elevate your culinary experience and relish a variety of delightful meals each day.
Read More
Oven-Roasted Sweet Potatoes with Luscious Center and Crunchy Exteriors
# Roasted Sweet Potatoes: A Warm and Flexible Accompaniment
Roasted sweet potatoes are an effortless, low-maintenance side that delivers a lovely contrast between crisp exteriors and airy, soft insides. This straightforward cooking method provides a warm and adaptable addition to any dining experience, making them a popular choice for both laid-back meals and special celebrations.
## Taste Profile
Roasted sweet potatoes feature sweet, buttery interiors paired with savory, well-seasoned skins. Their innate sweetness complements a range of toppings, enhancing their versatility across various culinary styles and personal tastes.
## Why Prepare Roasted Sweet Potatoes?
The charm of roasted sweet potatoes lies in their simple preparation and cooking process. Using only a baking tray, a fork, and chosen seasonings, you can produce perfectly roasted sweet potatoes every time. This technique minimizes dish usage, simplifying the cleanup process.
## Method
The process for roasting sweet potatoes is simple:
1. Create holes in the potatoes to let steam escape.
2. Coat them with oil and seasonings to boost flavor and texture.
3. Roast until tender, then let them rest briefly before serving.
## Skill Level
This dish is accessible for cooks of any proficiency, requiring little effort and time for preparation.
## Ingredients
– **Sweet Potatoes**: Select medium-sized sweet potatoes that are roughly uniform for consistent cooking. Prefer orange-fleshed types, as they usually result in a fluffier texture. Be cautious of the distinction between sweet potatoes and yams, as they are commonly misidentified in stores.
– **Seasonings**: Applying olive oil, avocado oil, vegetable oil, or melted butter to the skins promotes browning and imparts a delicious roasted flavor.
## Sweet Potato Garnishes
After your sweet potatoes are roasted, the topping possibilities are limitless. You can personalize them with items such as:
– Butter or ghee
– Brown sugar or maple syrup
– Cinnamon or nutmeg
– Sour cream or Greek yogurt
– Chopped nuts or seeds
– Fresh herbs or chives
## Steps to Roast Sweet Potatoes
1. Preheat your oven to 375°F (190°C).
2. Wash and dry the sweet potatoes. Poke holes in each potato with a fork, about 3-4 times on each side.
3. Coat the skins with olive oil and sprinkle with salt and pepper.
4. Arrange the potatoes on a baking sheet and roast for 50-60 minutes, or until tender when pierced with a fork. Let cool for 5 minutes before slicing open.
### Cooking Temperature and Times
– Roast at 350°F for 60 to 75 minutes
– Roast at 375°F for 50 to 60 minutes
– Roast at 400°F for 40 to 50 minutes
Cooking times may differ based on the size of the sweet potatoes. Make sure they are soft when tested with a fork.
## Tips for Ideally Roasted Sweet Potatoes
– **For uniform cooking**: Roast potatoes that are similar in size.
– **For perfect roasting**: Ensure the potatoes are thoroughly dried before applying oil to guarantee the skins roast rather than steam.
– **To avoid cracking**: Poke sufficient holes (3 to 4 per side) for steam to escape.
– **For drier skins**: Refrain from using foil.
– **For extra airy centers**: Slice open immediately after roasting and gently fluff with a fork to release steam.
– **Meal prep suggestion**: Roast a batch and use leftovers in breakfast bowls, quick mashed sweet potatoes, or stir into chili.
## Storage, Freezing, and Reheating
Leftover roasted sweet potatoes can be kept in an airtight container in the refrigerator for up to 4 days. For freezing, scoop out the cooked flesh, cool it, and then store in airtight bags for up to 3 months. Thaw in the refrigerator and reheat in the microwave or a 375°F oven until warmed through.
Roasted sweet potatoes are not only a delightful side but also a nutritious option, packed with vitamins and minerals. Enjoy exploring various toppings and flavors to customize this flexible dish to your taste!
Read More
Pizza topped with Spinach and Artichokes
How to Create Spinach Artichoke Pizza
This pizza is easy to prepare, and if you’ve followed any of my pizza instructions, you’ll be familiar with the process! Or scroll down to the instructions below.
Step 1: Prepare (or make) the pizza dough
Refer to my favorite pizza dough recipe: it requires 15 minutes of mixing and 45 minutes of resting. If you’re opting for pre-made pizza dough, ensure it reaches room temperature for at least 30 minutes before you stretch it.
Position a pizza stone in the oven and preheat to 500°F. Allow at least 30 minutes for it to thoroughly heat up (the key to achieving a crispy crust!).
Step 2: Sauté the spinach and artichokes
Sauté the garlic in olive oil for roughly 30 seconds until aromatic. Incorporate the spinach and cook for 2 to 3 minutes, stirring, until it wilts completely. Add the chopped artichoke hearts and cook for an additional minute. Remove from heat and set aside.
Tip: If you’re using frozen spinach, feel free to add the spinach with the artichoke hearts and skip the sautéing time for the spinach.
Step 3: Stretch and add toppings to the dough
Dust a pizza peel with semolina flour or cornmeal. (No peel? Use the backside of a rimless baking sheet.) Stretch the dough into a round shape: refer to my guide on how to stretch pizza dough. Carefully transfer to the peel.
Brush the entire surface with a light layer of olive oil. Distribute the shredded mozzarella cheese, spinach-artichoke mixture, Pecorino Romano or Parmesan, and sprinkle with a few pinches of kosher salt.
Step 4: Bake
Slide the pizza off the peel and onto the preheated pizza stone. Bake for 5 to 7 minutes in a conventional oven (or approximately 1 minute in a pizza oven) until the cheese is bubbling and the crust is golden. Slice and serve right away.
Read More
Enhanced Boy Kibble: An Improved Option
# What Exactly is Boy Kibble and Why Has it Become So Popular?
Boy kibble has recently caught a lot of attention across social media channels, igniting curiosity among numerous individuals, particularly those who aren’t acquainted with the term. This piece explores what boy kibble is, its components, cooking methods, nutritional values, and the factors contributing to its rising trend.
## What is Boy Kibble?
Boy kibble is fundamentally a straightforward dish created from ground beef and rice, frequently served with a variety of sauces or toppings. It is notable for its high protein levels and simple preparation, which makes it a favored selection among college students and young adults. The meal is not only quick to prepare but also fulfills the cravings of those in search of a substantial dish without advanced culinary skills.
## How to Prepare Boy Kibble
Preparing boy kibble is uncomplicated and demands minimal cooking expertise. Here’s an easy recipe:
1. **Prepare Some Rice**: Cook your rice using your chosen method, whether it’s on the stovetop or in a rice cooker.
2. **Brown the Ground Beef**: In a non-stick frying pan, brown the ground beef, seasoning it well with salt and pepper. Break it into smaller pieces while it cooks. After it’s browned, incorporate any spices or sauces you prefer.
3. **Plate It Up**: Place rice on a dish, layer it with the seasoned beef, and add any toppings if you like.
## Ingredients for Boy Kibble
The fundamental ingredients for boy kibble consist of:
– **Ground Beef**: The main source of protein, typically around one pound of lean or standard ground beef.
– **Rice**: Any type of rice you prefer, with brown rice being a more nutritious choice.
– **Spices/Seasonings**: Crucial for flavor, options include hot sauces, seasoning blends from instant noodles, or various spice mixtures.
– **Toppings**: Optional items such as herbs, vegetables, or crispy onions can improve the dish.
## How to Flavor Boy Kibble
To enhance the taste of boy kibble, think about using these seasonings:
– **Chicken Salt**: A combination of chicken bouillon, garlic powder, onion powder, and salt.
– **Taiwanese Spice Combination**: A mix of five spice, white pepper, black pepper, garlic powder, and salt.
– **Soy Sauce**: A naturally fermented soy sauce brings richness to the dish.
– **Chili Crisp**: For added crunch and flavor.
## The Craze for High Protein
In recent times, there has been an increasing inclination towards high-protein diets. Protein is vital for muscle development, tissue recovery, and overall fullness. Boy kibble, with its substantial protein content from ground beef, fits seamlessly into this dietary trend.
## Is Boy Kibble Nutritious?
Although boy kibble is rich in protein, it might lack nutritional balance, particularly if prepared with white rice. To enhance its health benefits, consider swapping white rice for brown rice or incorporating leafy greens for additional vitamins and fiber.
## Why is Boy Kibble Gaining Traction?
The charm of this dish lies in its cost-effectiveness, straightforwardness, and the catchy name that appeals to a younger demographic. Boy kibble is perceived as a low-effort yet rewarding meal that aligns perfectly with the hectic schedules of many.
## What’s Behind the Name Boy Kibble?
The term “boy kibble” serves as a whimsical rebranding of classic ground beef rice bowls. It encapsulates the spirit of a quick, fulfilling meal that is often linked to young men, similar to the notion of “girl dinner.”
In summary, boy kibble has surfaced as a trending food phenomenon thanks to its simplicity, high protein content, and cultural relevance. Whether you’re an experienced cook or a novice, boy kibble is a convenient and delightful meal option to consider.
Read More
Robust and Tasty Chicken Stew Recipe
Chicken Stew
Prep Time: 15 minutes Cook Time: 45 minutes Total Time: 1 hour Servings: 6
A delicious chicken stew brimming with an abundance of vegetables and herbs!
ingredients
- 2 tablespoons oil
- 2 tablespoons butter
- 1 pound boneless, skinless chicken breasts or thighs, chopped into bite-sized pieces
- 2 tablespoon flour (gluten-free for gluten-free)
- 1 cup onion, chopped
- 1 cup carrot, chopped
- 1 cup celery, chopped
- 2 tablespoons garlic, minced
- 2 teaspoons sage, minced (or 1 teaspoon dried)
- 2 teaspoons rosemary, minced (or 1 teaspoon dried)
- 2 teaspoons thyme, minced (or 1 teaspoon dried)
- 2 tablespoon flour (gluten-free for gluten-free)
- 6 cups chicken stock (link)
- 2 cups potatoes, chopped
- 2 bay leaves (optional)
- 1/2 cup heavy/whipping cream
- 1/4 cup grated parmigiano reggiano (parmesan cheese)
- 1 cup peas (optional)
- 1 tablespoon parsley, minced (optional)
- salt and pepper to taste
directions
- In a large saucepan over medium heat, heat the oil and melt the butter, then add the chicken mixed with the flour, cooking for about 8-10 minutes before removing it from the pan.
- Introduce the onion, carrot, and celery into the pan, cooking until soft, roughly 10-15 minutes.
- Incorporate the garlic, sage, rosemary, and thyme, then sprinkle in the flour, stirring well and cooking for an additional minute.
- Pour in 1/2 cup of broth to deglaze the pan, scraping up the browned bits on the bottom as the broth simmers.
- Add the remaining broth, along with the chicken, potatoes, and bay leaves, bringing the mixture to a boil, then reduce the temperature to simmer until the potatoes are tender, approximately 20 minutes.
- Discard the bay leaves, then mix in the cream and parmesan, allowing the cheese to melt into the broth.
- Stir in the peas and parsley, seasoning with salt and pepper to taste, and enjoy!
Option: Skip the flour! It is used to thicken the broth.
Option: Include 8 ounces of sliced mushrooms together with the onions.
Option: Add 1 diced bell pepper along with the onions.
Option: Incorporate 1 tablespoon of tomato paste when adding the garlic.
Option: Utilize 1/4 teaspoon of turmeric,

Creamy Chicken Noodle Soup Instructions
# Creamy Chicken Noodle Soup
This luscious chicken noodle soup is an enjoyable dish that blends thick noodles, juicy pieces of chicken, and a savory mix of flavors from creamy thyme, garlic, and veggies. It’s a soothing meal ideal for any event, particularly on cold days.
## Why I Adore This Soup
Not long ago, after a hectic evening, I came home with my family, all of us feeling ravenous. I had made this soup in advance, and it was ready for us in the Dutch oven. As we served ourselves, the atmosphere buzzed with excitement, and we eagerly plunged into the deliciousness without uttering a word. The mix of thick noodles, tender chicken, and the creamy touch of thyme and garlic really elevates this soup.
At first, I intended for a thicker consistency like chicken wild rice soup but found myself captivated by this lighter, brothier variation. It delivers the indulgent flavor of cream and herbs while maintaining a delightful slurpability that feels just perfect for chicken noodle soup. The leftovers were something I looked forward to throughout the week.
## How To Prepare Creamy Chicken Noodle Soup
### Ingredients
– Olive oil
– Onions
– Carrots
– Celery
– Garlic
– Fresh thyme
– Chicken broth
– Egg noodles
– Cooked chicken
– Fresh spinach (optional)
– Heavy cream
– Parmesan cheese (for serving)
### Instructions
1. **Cook Vegetables**: Warm olive oil in a large Dutch oven over medium heat. Add onions, carrots, and celery; sauté for 7-10 minutes until tender and beginning to caramelize.
2. **Add Seasoning and Herbs**: Mix in garlic, salt, and thyme sprigs; sauté for a minute until aromatic.
3. **Broth and Noodles**: Incorporate chicken broth and noodles. Bring to a gentle simmer and cook for about 10 minutes, or until the noodles are soft.
4. **Finish**: Take off heat and remove thyme sprigs. Mix in spinach, chicken, and cream until heated through and spinach is wilted. If oil separates on top, let it sit for 10-20 minutes to reabsorb or stir before serving.
5. **Serve**: Delight in with warm crusty bread and a dusting of freshly grated Parmesan cheese.
## FAQ About Creamy Chicken Noodle Soup
– **How can you make this dairy-free?**
You can use a dairy-free heavy cream or gradually whisk in eggs for a creamy texture.
– **How can you make this vegetarian?**
Replace the chicken with a can of chickpeas.
– **What do you pair with this soup?**
Oyster crackers complement it well, along with a green salad and crusty bread.
– **What noodles are best to use?**
While I favor Mrs. Miller’s egg noodles, any egg noodle works nicely. Wheat-based noodles like orzo, ditalini, or rotini are also fantastic choices.
## Conclusion
This creamy chicken noodle soup is not only scrumptious but also simple to make, making it an excellent option for family dinners or cozy evenings in. With its rich flavors and comforting texture, it’s bound to become a beloved dish in your home. Enjoy!
Read More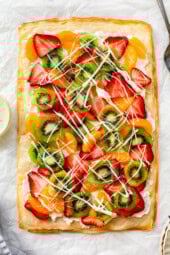
Fruit Tart with Filo Pastry
**Title: Crafting an Exquisite Fruit Tart with Phyllo Dough**
Fruit tarts are a cherished dessert that blends the innate sweetness of fresh fruits with a rich filling and a flaky, buttery crust. When prepared with phyllo dough, these tarts gain an extra dimension of texture and elegance, providing a pleasurable crunch that contrasts wonderfully with the tender fruits and creamy filling. Here’s a guide on how to create a fruit tart using phyllo dough, as well as a few suggestions to ensure your dessert is both tasty and visually appealing.
**Ingredients:**
– **For the Phyllo Dough Crust:**
– 8 sheets of phyllo dough
– 1/2 cup unsalted butter, melted
– 2 tablespoons granulated sugar
– **For the Filling:**
– 1 cup mascarpone cheese
– 1/2 cup heavy cream
– 1/4 cup powdered sugar
– 1 teaspoon vanilla extract
– **For the Topping:**
– 2 cups mixed fresh fruits (like strawberries, blueberries, kiwi, and raspberries)
– 1/4 cup apricot jam (optional, for glazing)
**Instructions:**
1. **Prepare the Phyllo Dough Crust:**
– Preheat the oven to 350°F (175°C).
– Place one sheet of phyllo dough on a clean, dry surface. Lightly brush it with melted butter and sprinkle a bit of granulated sugar over it.
– Add another sheet on top and repeat until all eight sheets are stacked.
– Gently fit the layered phyllo into a tart pan, trimming any excess edges.
– Bake in the preheated oven for 10-12 minutes, or until golden and crispy. Allow it to cool completely.
2. **Make the Filling:**
– In a mixing bowl, blend together mascarpone cheese, heavy cream, powdered sugar, and vanilla extract.
– Whip the mixture until smooth and creamy. Adjust sweetness to your preference if needed.
3. **Assemble the Tart:**
– After the phyllo crust has cooled, spread the mascarpone filling evenly over the base.
– Arrange the fresh fruits on top of the filling in a decorative manner. Feel free to get creative with the layout for an appealing presentation.
4. **Optional Glaze:**
– For a shiny finish, warm the apricot jam in a small saucepan over low heat until it liquefies.
– Use a pastry brush to gently coat the fruits with the warm jam.
5. **Serve:**
– Chill the tart in the refrigerator for no less than an hour before serving to let the filling set.
– Slice and serve cold, savoring the delightful fusion of creamy filling, crunchy phyllo, and fresh fruit.
**Tips for Success:**
– **Handling Phyllo Dough:** Phyllo dough can be fragile and dries out fast. Keep unused sheets covered with a damp towel while working to avoid them becoming brittle.
– **Fruit Selection:** Opt for fruits that are in season for optimal flavor. Ensure they are ripe yet firm to preserve their shape and texture.
– **Customization:** Try different fillings such as pastry cream or lemon curd, and experiment with various fruit combinations to match your taste.
A fruit tart with phyllo dough is not just a treat for the palate but also a visual spectacle. Its sophisticated look and refreshing tastes make it an ideal dessert for special occasions or a delightful indulgence to enjoy with loved ones.
Read More